Another Cordova Mashup - Pixelatize
One of the things I love about Cordova is how you can take existing client-side libraries and mash them up with the device features Cordova provides. The example I typically give of this is a demo I built a few years ago that mashes up the camera and a library called Color Thief. A few days ago I saw Jenn Schiffer (who is a pretty cool individual and someone you should follow on Twitter) release a library called Pixelatize. As you can probably guess by the name (which, by the way, is freaking hard to type right multiple times in a row), it takes an image and pixelates it. She has an online demo here so can you test it in your browser. I thought it would be fun to connect this to the device camera with Cordova. Here is how I did it.
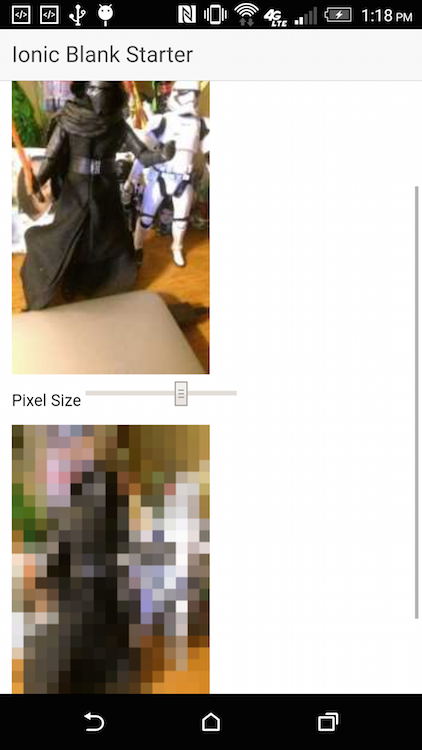
First, I created a new Ionic blank template. For my UI, I decided I'd include a button to take the picture, an image for the original picture, a slider that lets you determine how pixelated the result should be, and the result image. To be honest, this is a bit much and could be layed out better. I think I could remove the original image since you probably don't care about that, but whatever, this was just a fun demo. Here's the code for the index.html page.
<!DOCTYPE html>
<html>
  <head>
    <meta charset="utf-8">
    <meta name="viewport" content="initial-scale=1, maximum-scale=1, user-scalable=no, width=device-width">
    <title></title>

    <link href="lib/ionic/css/ionic.css" rel="stylesheet">
    <link href="css/style.css" rel="stylesheet">

    <script src="lib/ionic/js/ionic.bundle.js"></script>

    <script src="cordova.js"></script>

    <!-- your app's js -->
    <script src="js/app.js"></script>
    <script src="lib/pixelatize.js"></script>
  </head>
  <body ng-app="starter">

    <ion-pane>
      <ion-header-bar class="bar-stable">
        <h1 class="title">Pixelatize Demo</h1>
      </ion-header-bar>
      <ion-content class="padding" ng-controller="MainCtrl">

        <button class="button button-block button-positive" ng-click="selPicture()" ng-disabled="appNotReady">Select Picture</button>

        <img id="selectedImage">

        <p>
        <label for="pixelSize">Pixel Size
        <input type="range" id="pixelSize" ng-model="pixelSize" min="1" max="15"></label>
        </p>

        <canvas id="image" ></canvas>
      </ion-content>
    </ion-pane>
  </body>
</html>
There's nothing fancy here. Note though that I'm using a canvas for the second image. This comes directly from Jenn's demo. Now let's look at the application logic.
// Ionic Starter App

// angular.module is a global place for creating, registering and retrieving Angular modules
// 'starter' is the name of this angular module example (also set in a <body> attribute in index.html)
// the 2nd parameter is an array of 'requires'
angular.module('starter', ['ionic'])

.controller('MainCtrl', function($scope, $ionicPlatform) {
  $scope.appNotReady = true;
  $scope.pixelSize = 10;

  $ionicPlatform.ready(function() {
    $scope.appNotReady = false;
    $scope.$apply();
    var imgDom = document.querySelector("#selectedImage");
    var canvasDom = document.querySelector("#image");

    $scope.selPicture = function() {

      navigator.camera.getPicture(function(url) {
        imgDom.onload = function() {
          pixelatizeModule.pixelatizeImage(imgDom, canvasDom, parseInt($scope.pixelSize,10));
        }
        imgDom.src = url;
      }, function(err) {
        console.log('err', err);
      }, {
        quality: 50,
        sourceType:Camera.PictureSourceType.CAMERA,
        destinationType:Camera.DestinationType.FILE_URI,
        targetWidth:300,
        targetHeight:300
      });
    };

  });

})
.run(function($ionicPlatform) {
  $ionicPlatform.ready(function() {
    // Hide the accessory bar by default (remove this to show the accessory bar above the keyboard
    // for form inputs)
    if(window.cordova && window.cordova.plugins.Keyboard) {
      cordova.plugins.Keyboard.hideKeyboardAccessoryBar(true);
    }
    if(window.StatusBar) {
      StatusBar.styleDefault();
    }
  });
})
There isn't much here. I basically just shell out to the Camera API when you hit the button. Once the image is loaded, I then call Jenn's library. During testing I just used the photo gallery on the iOS Simulator but switched to the real camera when I was done. If you were building a "real" app for this you could easily use two buttons to let the user decide between their existing photos and a brand new one.
The final bit of code is Jenn's library, which I modified a bit to fit the JavaScript module pattern. I feel smart when I do crap like that, but any bugs here are from me, not her code.
var pixelatizeModule = (function() {

  var ctx, imgWidth, imgHeight;

  var getAverageRGB = function(imgData) {
    var red = 0;
    var green = 0;
    var blue = 0;
    var total = 0;

    for ( var i = 0; i < imgData.length; i += 4 ) {
      if ( imgData[i+3] !== 0 ) {
        red += imgData[i+0];
        green += imgData[i+1];
        blue += imgData[i+2];
        total++;
      }
    }

    var avgRed = Math.floor(red/total);
    var avgGreen = Math.floor(green/total);
    var avgBlue = Math.floor(blue/total);

    return 'rgba(' + avgRed + ',' + avgGreen + ',' + avgBlue + ', 1)';
  };

  var pixelatize = function(size) {
    for ( var x = 0; x < imgWidth; x += size ) {
      for ( var y = 0; y < imgHeight; y += size ) {
        var pixels = ctx.getImageData(x, y, size, size);
        var averageRGBA = getAverageRGB(pixels.data);
        ctx.fillStyle = averageRGBA;
        ctx.fillRect(x, y, size, size);
      }
    }
  };

  return {

    pixelatizeImage:function(imgDom, canvasDom, pixelSize) {
      ctx = canvasDom.getContext('2d');

      img = new Image();
      img.onload = function() {
        imgWidth = img.width;
        imgHeight = img.height;
        canvasDom.setAttribute('width', imgWidth);
        canvasDom.setAttribute('height', imgHeight);
        ctx.drawImage(img,0,0);
        pixelatize(pixelSize);
      }
      img.src = imgDom.src;

    }
  }

}());
It is surprisingly small and simple for what it does - but there's no way in hell I would have figured this out. So how about some samples?
First, a scary one:

Then a cooler one:

You can find the complete code for this here: https://github.com/cfjedimaster/Cordova-Examples/tree/master/pixelatize. Enjoy!