Testing Multiple Image Recognition Services at Once
I'm a big fan of image recognition APIs - by that I mean services that let you send in a picture and have them scanned to determine what's actually in the picture. When they work well, it's cool as heck. When they fail, it's typically pretty funny. All in all that's a win-win for me. For a while now I've been wanting to build something that would let me compare multiple services like this at the same time. This week - I did that.
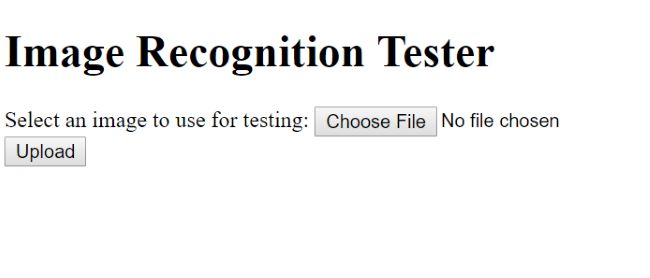
I call it "RecogTester", which isn't very imaginative, but it provides a reports via Google's Cloud Vision API, IBM Bluemix's Visual Recognition API, and Microsoft's Computer Vision API. The UI of my app isn't spectactuclar, but here's how it looks.
Initially, it is just a form prompting you to select a picture:

As soon as you do, I use a bit of code to create a preview:

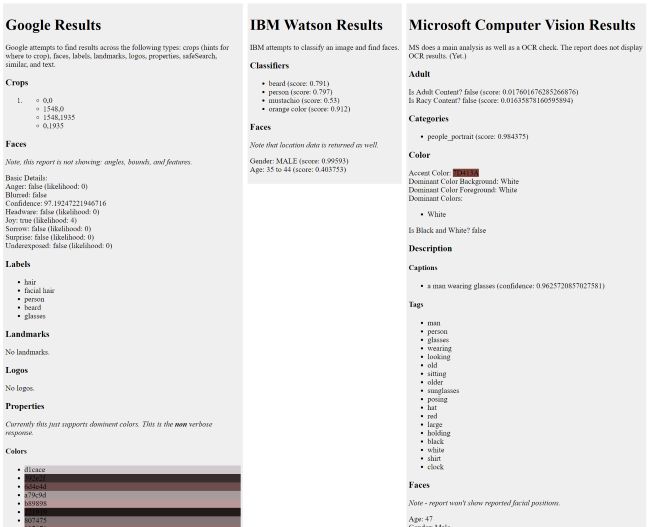
As soon as you upload, it sends the image to my Node server and then fires off requests to the 3 services. When done, it renders:

That may be a bit hard to read in a screenshot so I've created a PDF export of the page here: https://static.raymondcamden.com/images/2017/6/samplereport.pdf.
I'm not hosting this application live on the Internet as I'd be charged for usage, but you can find the complete source code for it on my GitHub here: https://github.com/cfjedimaster/recogtester
Alright, first I'm going to dig into the code, and then I'll talk about the services and how easy/hard it was to make use of them. Disclaimer - I work for IBM, so my opinion may be biased.
The Server
The server component consists of one main application file and then a service file for each image API. Here's my index.js:
const express = require('express');
const app = express();
const chalk = require('chalk');
const formidable = require('formidable');
const path = require('path');
const creds = require('./creds.json');

const google = require('./google');
const ibm = require('./ibm');
const microsoft = require('./microsoft');

app.use(express.static('public'));

app.post('/test', (req, res) => {
	console.log(chalk.green('About to Test!'));
	let form = new formidable.IncomingForm();
	form.keepExtensions = true;

	form.parse(req, (err, fields, files) => {
		if(!files.testImage) {
			res.send({result:0});
			return;
		}
		let theFile = files.testImage.path;

		/*
		now we go through N services
		*/

		let gProm = google.doProcess(theFile, creds.google);
		let iProm = ibm.doProcess(theFile, creds.ibm);
		let mProm = microsoft.doProcess(theFile, creds.microsoft);

		Promise.all([gProm, iProm, mProm]).then((results) => {
			res.send({result:{
				'google':results[0],
				'ibm':results[1],
				'ms':results[2]
			}});
		}).catch((err) => {
			console.log('Failures', err);
		});


	});

});

app.listen(3000, () => {
	console.log(chalk.green('Listening on port 3000'));
});
The only thing here really interesting is the use of Promises to fire off calls to my API testers. I can then use Promise.all to wait for them all to finish. I know I've talked about Promises a lot, but I just want to remind folks about how darn useful they are for situations like this.
Google's Cloud Vision API
The first service I built was for Google. In the past, I've found Google's authentication/authorization stuff for APIs to be a bit obtuse. I could always get it working, but I had to struggle a bit to remember what I had to do. It felt like that if I needed one hour to build an API wrapper, a good 15 minutes of that was just trying to enable the API and let me server hit it.
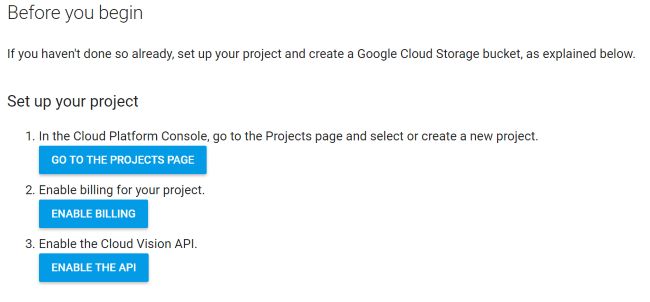
Google has made some good improvements in this area, and you can see it in the Quickstart:

Those buttons lead you right to the correct place and help you setup what you'll need for access. Then it's simply a matter of using the API. Google provides a NPM package so after including it, the code is super easy. However, authentication/authorization was a problem again. Instead of just copying a key value into your code, you need to get a JSON file exported that includes your authorization info. This is documented here but you have to dig a bit to grok that you copy the values of the keyfile into code. For my project I use one main creds.json file and I simply copied the contents of keyfile into it. You won't find that file in GitHub, obviously, but I do describe the "shape" of it in the readme.
Once you've gotten past that, the API is hella easy to use. Here's the entirety of my service wrapper:
const Vision = require('@google-cloud/vision');


function doProcess(path,auth) {

	const visionClient = Vision({
		projectId:auth.project_id,
		credentials:auth
	});

	return new Promise((resolve, reject) => {

		console.log('Attempting Google Image recog');
		visionClient.detect(path, {
			types:['crops', 'document', 'faces', 'landmarks',
				'labels', 'logos', 'properties', 'safeSearch',
				'similar', 'text']
		})
		.then((results) => {
			resolve(results[0]);
		})
		.catch((err) => {
			console.error('ERROR:', err);
			reject(err);
		});

});

}

module.exports = { doProcess }
The only thing special here is me specifying what type of analysis I care about. In this case, all of them. In a more real-world scenario you'll probably use a bit less. All in all, the coolest aspect of the API is the "similar" results. In most cases it returned exact copies (which could be useful for hunting down people stealing your work), but when it truly found different, but similar results, it was neat as heck. As an example, I uploaded this:

And Google returned:

IBM Watson Visual Recognition
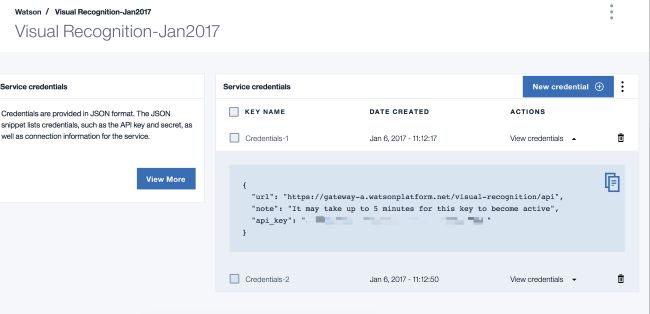
Next I built my wrapper for Watson Visual Recognition. I've used this service a few times already so it's easy for me, but again, I'm biased. Using it requires signing up for Bluemix (you can do so for free here) and then simply adding a new instance of the service. When you do, you can then quickly get the credentials via the UI:

The Watson team provides a npm module (watson-developer-cloud) that makes working with the service relatively easy. I ran into one problem though - the face detection API wasn't documented. (I filed a bug report for that.) Here is the code for my service wrapper.
var VisualRecognitionV3 = require('watson-developer-cloud/visual-recognition/v3');
var fs = require('fs');

function doProcess(path, auth) {

	return new Promise((resolve, reject) => {

		console.log('Attempting IBM recog');
		var visual_recognition = new VisualRecognitionV3({
			api_key: auth.api_key,
			version_date: VisualRecognitionV3.VERSION_DATE_2016_05_20
		});

		var params = {
			images_file: fs.createReadStream(path)
		};

		let mainP = new Promise((resolve, reject) => {

			visual_recognition.classify(params, function(err, res) {
			if (err)
				reject(err);
			else
				resolve(res);
			});

		});

		let faceP = new Promise((resolve, reject) => {
			visual_recognition.detectFaces(params, function(err, res) {
			if (err)
				reject(err);
			else
				resolve(res);
			});
		});

		Promise.all([mainP, faceP]).then(values => {
			let result = {
				main:values[0].images[0],
				faces:values[1].images[0]
			};
			resolve(result);
		});

	});

};

module.exports = { doProcess }
Fairly simple, and I use promises again to handle the 2 calls. The results can be pretty freaking insane at times. While I found the amount of data returned to be much smaller than Google or Microsoft, the classifiers (or tags), were insane accurate at times. Consider this picture:

Watson's first classification was that it was an aircraft, which is spot on, but number 4 was that it was a jumbojet, which is spot on if I know my planes.
Microsoft Computer Vision
This one was the most difficult to setup. Mainly because I assumed I needed to set my authentication up under Azure and get the Azure npm package. That was problematic because the initial links for it were partialled 404ed and for the ones that worked, led to a zip file. I had to click around to find the actual npm package name so I could install it the right way... and then I discovered that I was wrong. This isn't under Azure and there isn't a npm package for it. Sigh
However, once I got to the right page in the docs it was really quick to get my key. While there's no Node examples, there's multiple JavaScript examples. Unfortunately, none of these show a file upload example, which is unfortunate since you can do file uploads with XHR2. My concern here was that sometimes APIs that work with file uploads require a particular name for the file and I didn't see this documented. So I just gave it a random name and it worked fine.
To summarize - a bit of a rough start (partially my fault for not reading the docs closely) but once I got past that - it was easy to write my wrapper. Here it is:
var request = require('request');
var fs = require('fs');

function doProcess(path, auth) {

	let mainUrl = auth.url;

	let headers = {
		'Content-Type':'application/json',
		'Ocp-Apim-Subscription-Key':auth.key
	}

	return new Promise((resolve, reject) => {

		console.log('Attempting Microsoft recog');

		let formData = {
			theFile:fs.createReadStream(path)
		}

		let mainP = new Promise((resolve, reject) => {

			let theUrl = mainUrl +
			'/analyze?visualFeatures=Categories,Tags,Description,Faces,ImageType,Color,Adult&details=Celebrities,Landmarks&language=en';

			request.post({url:theUrl, headers:headers, formData:formData}, function(err, response, body) {
				if(err) {
					reject(err);
				} else {
					resolve(JSON.parse(body));
				}
			});

		});

		let ocrP = new Promise((resolve, reject) => {

			let theUrl = mainUrl + '/ocr?language=unk';

			request.post({url:theUrl, headers:headers, formData:formData}, function(err, response, body) {
				if(err) {
					reject(err);
				} else {
					resolve(JSON.parse(body));
				}
			});

		});

		Promise.all([mainP, ocrP]).then(values => {
			let result = {
				main:values[0],
				ocr:values[1]
			};
			resolve(result);
		});

	});


}

module.exports = { doProcess }
Microsoft has a seperate API for text recognition (OCR) so that's why I've got two calls here. (Although in general, the OCR didn't seem to work well for me.) I like that the service returned metadata about the image itself though and it's kinda cool that it tries to detect clip art too. The neatest aspect though was it's description service, which tries to describe the picture in English. Consider this input:

Microsoft's API described it like so:
a plane flying over a body of water with a city in the background
Damn. Like, damn that's good. The picture of me up top? It said:
a man wearing glasses
It wasn't always accurate, but the 'score' it gave it's caption seemed to go down appropriately when it was wrong. But more often than not it was spot on.
And that's it. You can find the rest of the code at the repo. My error handling is not in place, but as this will never be public, it works well enough for me. (Although if Google or MS want to provide me with free usage, I'll put it up. ;) Let me know what you think and what results you get in the comments below.