For a while now I've been a huge fan of Postman. If you've never heard of it, it's an incredibly powerful tool for working with APIs. I know a lot of folks like to use Curl at the command line for doing HTTP calls, but I much prefer a visual tool instead. Plus, Postman makes it much easier to save and organize API tests for use later. It's free, supported everywhere, and I strongly recommend it. I've been using Postman lately with OpenWhisk and I thought it would be useful to share a basic explanation on how you could use them together. To be clear, there is nothing "special" about OpenWhisk and it's APIs. If you already know Postman well, then you don't have to do anything special to use it, but for folks who may be new to Postman, I thought a quick overview would be useful. Alright, ready? Let's go!
First and foremost, you want to begin by installing the Postman client.

Grab the bits for your operating system, install, run, and you'll be ready to go. Remember that this is an actual application. I'm on Windows but always grab the Linux bits for command line stuff since I'm using WSL (Windows Subsystem for Linux). In this case, though, I'd want the Windows client.
My focus on this post will be related around using Postman for OpenWhisk, so if you want to learn everything about the tool, you should check out the docs. The first thing I'd suggest though is creating a "Collection" for your tests. A collection is like a folder, and generally you should use one per project, or set of tests. For this blog entry I made a new one, "OpenWhisk+Postman".

Alright - so let's build a quick a OpenWhisk action. This one is trivially simple, but it serves our purposes for testing.
function main(args) {

	if(!args.name) args.name = 'Nameless';
	let result = `Hello, ${args.name}`;

	return {
		result:result
	}

}
As you can see, this will simply echo back "Hello, X" where X is a name. By default it will be "Nameless", but you can pass a parameter called name to change this. I stored this on OpenWhisk as the action name, postmantest.

Remember that there are three main ways of calling your OpenWhisk actions via HTTP:
- Via the authenticated REST API - this is what the CLI uses.
- Via a Web Action
- Via a Managed API
Let's cover these one by one.
Authenticated REST API
Using the REST API does not require any special modifications to your actions. In order to call the API via Postman, we'll need two things - the URL (of course) and the authorization information. Luckily this is pretty easy to figure out. The URL to invoke your action will - generally - look like so:
https://openwhisk.ng.bluemix.net/api/v1/namespaces/_/actions/postmantest
The underscore there represents the "default" package. If I had put my action in the "foo" package, you would see foo/actions instead. But if you forget this URL 'pattern', there is a quick way to find it. When using the CLI to work with OpenWhisk, you can always add the -v flag to enable verbose mode. This will share a lot of additional information, including the URL and authorization headers passed. Here's an example:

There's a few things to notice here. First off, notice that the URL has two additional arguments, blocking=true and result=true. These are critical to ensure you actually get a result from the call and not just an activation ID. The result one though you may want to edit, especially if you want to keep see the metadata of your call (for example, how long it took to run).
The next thing to note is the authorization header. The authenticated REST API is - well - authenticated. That should be obvious. You can handle that authentication in one of two ways via Postman. You can either set a header called Authorization and pass the string exactly as you see in the command line output. Or you can tell Postman to use Basic authentication and supply the username and password. This is not the username and password for Bluemix. Rather, this is information that the OpenWhisk system sets up for you automatically and that you setup with the CLI. This is how the CLI is able to use your credentials to work on your actions. In theory you could use either with Postman, but it "feels" more proper to use the username and password values instead. So how do you get them? Just run wsk property get:

In the screen shot above, you can see where the information is displayed. The username is the ugly set of random digits before the colon and the password is everything after it. Now we have the bits be we need to add this to Postman.
You should have an empty tab available where you can add in the information required to call the API. First, copy the URL and change the method from GET to POST. Then in the "Authorization" tab, change the type to Basic Auth. Copy and paste the values from the CLI call above for your username and password.

Finally, click "Save". To be clear, you do not have to save Postman items. Postman will remember them even if you close the app, but if you plan on using the API again, it makes sense to do so. You can also give it a nice name.

Finally, use the bright blue "Send" button to run your test.
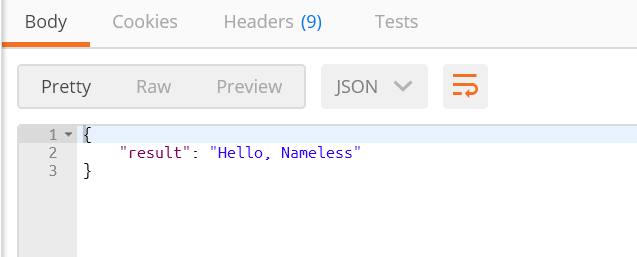
Note that Postman does a great job rendering the results along with returning all the additional headers in the result too. Notice too that the JSON was pretty printed and you have the option of switching to the raw view if you want. Finally, you can also easily save the result too.
To test passing a parameter, click on the test name in the left hand menu and use "Duplicate" to create a copy. Notice that "Authorization" is set to none, but if you switch it to "Basic Auth", it will have the values you used before. I then ran this test in the CLI:
wsk action invoke postmantest -b -r --param name Rey -v
Notice how the call is made this time:

As you can see, the param value was passed in the request body. Also, a content-type header was added. Let's see how to do that in Postman.
First, I selected the "Headers" tab and entered a new key of "Content-Type" with a value of "application/json". You'll notice that in both cases, Postman has autocomplete for these values, saving you some time.

Next select the Body tab, then the "raw" option, and enter your JSON packet:

Note that Postman will give you feedback if your JSON is malformed, which is pretty darn cool. Remember to save the API and then run it, and you should see the proper response:
{
    "result": "Hello, Rey"
}
Ok, onward and upward!
Web Actions
To use a web action, first you have to enable it via an annotation:
wsk action update postmantest --web true
At this point, your action is now enabled for anonymous access. The URLs for web actions follow a standard format that involves your username and space and all that, however another way to get is to simply log on to the Bluemix OpenWhisk Mangement UI, find your action, and go into "Additional Details":

You can simply copy that URL into a new Postman action. You'll want to use GET however. Here's the new Postman API with the web action URL:
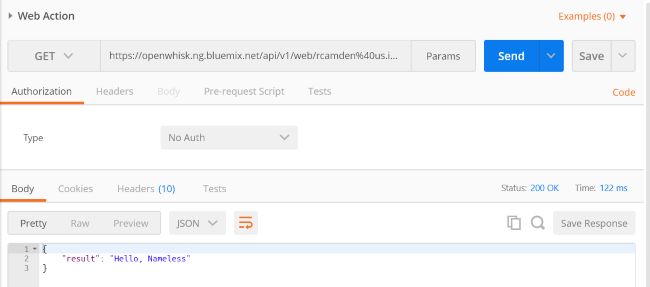
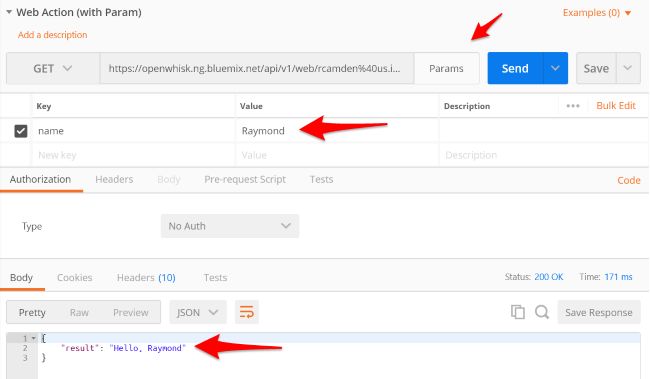
Passing parameters can be done via URL or Form parameters. Both are pretty easy in Postman, but let's consider a URL example. Duplicate the API test you just made and use the "Params" button next to the URL. You can then add the parameter, "name", with a value to test.
Now let's level up!
API Management
API management and the API gateway is a pretty big topic. Covering it completely is out of the scope of this post. You can expose your action as a managed API either via the CLI or the UI. The CLI will nicely print out the URL, so let's do that:
wsk api create /postmanapi /test GET postmantest
The output will give you the URL needed to run the API (spaces added to help it wrap):
https://service.us.apiconnect.ibmcloud.com/gws/apigateway/ api/37871051d18d0b2115da90f292458913e22e5d182c8a965fadcfbf6b5fcc96c6 /postmanapi/test
Much like web actions, you can then simply use this URL to get the "Nameless" response, or add a query parameter (again, spaces added for wrapping):
https://service.us.apiconnect.ibmcloud.com/gws/apigateway/ api/37871051d18d0b2115da90f292458913e22e5d182c8a965fadcfbf6b5fcc96c6 /postmanapi/test?name=tron
So in theory, you could duplicate your previous Postman actions with this new URL. But let's assume you want to test an authenticated managed API. In the UI, you can use the API tool to require authentication:
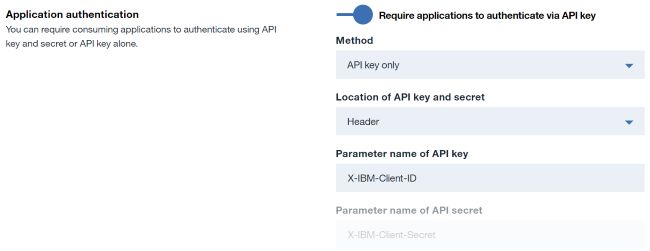
Don't forget to click "Save", then go into "Sharing" and click "Create API Key":
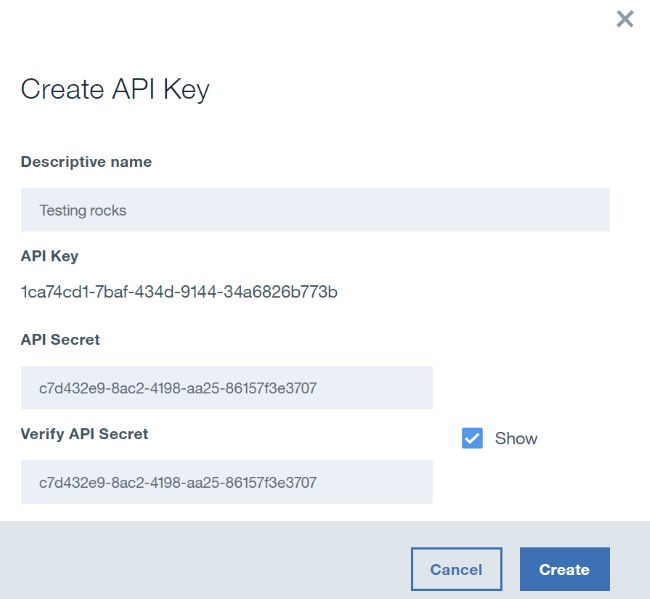
Note that you get both a key and a secret. You can select wether or not to require just the key or the key and secret. For now, I used just the key. Now let's test. We should set up 2 tests. One to call the URL without the key to confirm it is required, and one to confirm it works when passing the key. (And obviously we could test parameters as well, but I think we're safe to assume that works.)
First, I made a new API test in Postman with the URL and no authentication information:
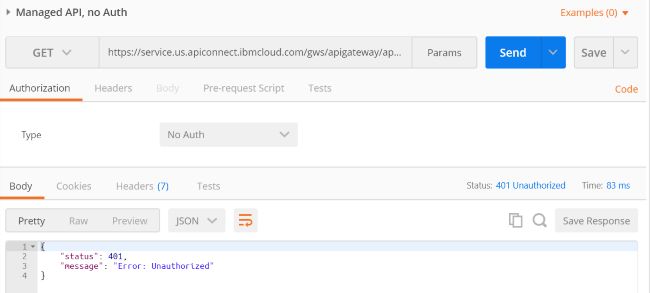
Perfect. Now we can duplicate this API and then add the proper header. The console tells us to use the header "X-IBM-Client-ID". I simply add that to the headers value and pass in the key:
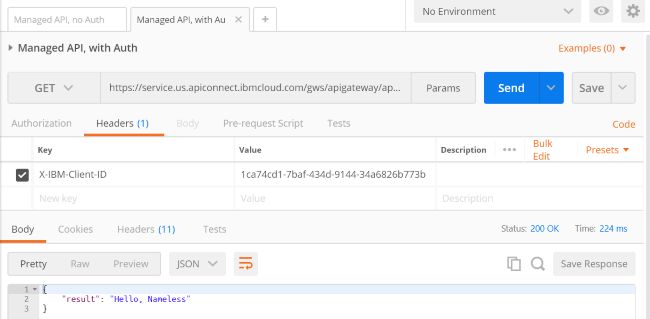
And there ya go!
Wrap Up
So I hope this was helpful, definitely leave me a comment below if it was, or if you have any other suggestions. While I barely touched on the greatness that is Postman, I want to point out one feature in particular that may be useful. Environments allow for the creation of variables that can be shared across a collection. When I duplicated my earlier tests, I didn't need to copy the username and password. But if they were to change, I'd have to change them in every instance. Environments let you specify these types of values and then use them in your API calls via simple tokens. It's incredibly useful for storing things like API keys.