Automating Media Asset Creation with Cloudinary's GenAI Transformations

I've been happily using Cloudinary on my blog for a few years now, but it's been quite some time since I've blogged about them. For folks who don't know, CLoudinary provides media APIs (image, video) that work via URLs. So for example, I can craft a Cloudinary URL that transforms a picture to resize it to a particular size. Or add text. Or compress it. Pretty much anything you can imagine doing with an image or a video, and probably a lot of things you can't think of, are all possible, and literally enabled by crafting a particular URL. It's shockingly powerful and easy at the same time.
More recently, they announced a set of AI capabilities, including -
- Generative resizing (i.e., make this picture bigger and image what would be in the areas you add)
- Remove or replace items from a picture
- Recoloring and enhancing
- Image to text (i.e., what's in this picture)
You can peruse the demos here: Generative AI Demos. Even better, you can literally open up their samples, modify the URL, and see the results.
So for example, this URL, which I took from their demo and modified myself to make it fit better on my blog:
Renders as such:

Then by tweaking the URL to add the command, /e_gen_replace:from_sweatshirt;to_raincoat, to get this:

Or heck, how about a cat hoodie:

To be clear, all I did was tweak the URL. On the first request, Cloudinary does the heavy lifting to generate the image and then serves the result. Subsequent requests are cached with no need to do anymore work.
Cool, so while there's numerous uses for this, I thought I'd demonstrate what's one really practical use for these APIs - generating assets for a media campaign. Imagine, for example, you've got one sample piece of media:

As an FYI, that image comes from their blog post on the topic.
We want to take this one image and reuse it in different campaigns which require different sizes as well as different copy. So for example, maybe we want something like this:

Everything you see in this image to the left and right of the original was AI generated. The text was then applied using other Cloudinary transformations.
How could we automate this? First, I began with two files that act as standins for database or other dynamic content. First, a sizes.txt file:
550x800
800x500
You can probably guess what they are. Next is a set of text we want to apply to the images. In this case, it's essentially the same message, but with different ways of trying to hook the viewer. You could also imagine different translations of one main message.
Flash Sale - 80% Off!
Holiday Sake - 80% Off!
Sale For You - 80% Off!
VIP Sale - 80% Off!
What we want to do is, for each size, and for each line of text, generate a new image. For this, I'm going to make use of their Python SDK.
I begin with some imports:
from dotenv import load_dotenv
load_dotenv()

import cloudinary
from cloudinary import CloudinaryImage
And then configure the Cloudinary SDK to use my credentials (these are read from the envrionment loaded with load_dotenv):
config = cloudinary.config(secure=True)
Cool. Now, read in my text files. Again, in the real world you could image this data coming from a database, maybe a Google Sheet or Sharepoint List.
# Read in our sizes first
sizes = [line.rstrip() for line in open('sizes.txt','r')]

# Then the text values we need
copy = [line.rstrip() for line in open('copy.txt','r')]
Alright, now, we do our looping:
for size in sizes:
    for text in copy:
        print(f"URL for copy, '{text}', at size, '{size}'")

       	width, height = size.split('x')
And here comes the complex part. While you can 'craft' URLs for Cloudinary by hand, the SDKs make it quite a bit simpler. It does take a bit of testing to get things right of course, and for more complex transformations, you need to take care. For me, I ensured I did one thing at a time. First, resizing using Cloudinary's generative fill, and then applying my text. Here's the command I used:
result = CloudinaryImage("original_for_demo").build_url(transformation= [
{"width": width, "height": height, "background": "gen_fill", "crop": "pad"},
{'color':"#FFFFFF", 'background': "black", 'border': "10px_solid_black", 'overlay': {'font_family': "Arial", 'font_size': 35, 'text': text}},
{'flags': "layer_apply", 'gravity': "south_east", 'x': 10, 'y': 10}
])
It's an array of transformations, in the order I described above. The only thing I didn't mention was the last transformation which handles putting my text in the bottom right of the image.
So, that's pretty much it, except for a final print command. Here's the entire script for reference:
from dotenv import load_dotenv
load_dotenv()

import cloudinary
from cloudinary import CloudinaryImage

config = cloudinary.config(secure=True)

# Read in our sizes first
sizes = [line.rstrip() for line in open('sizes.txt','r')]

# Then the text values we need
copy = [line.rstrip() for line in open('copy.txt','r')]

for size in sizes:
    for text in copy:
        print(f"URL for copy, '{text}', at size, '{size}'")

       	width, height = size.split('x')

        result = CloudinaryImage("original_for_demo").build_url(transformation= [
        {"width": width, "height": height, "background": "gen_fill", "crop": "pad"},
        {'color':"#FFFFFF", 'background': "black", 'border': "10px_solid_black", 'overlay': {'font_family': "Arial", 'font_size': 35, 'text': text}},
        {'flags': "layer_apply", 'gravity': "south_east", 'x': 10, 'y': 10}
        ])

        print(result, '\n')
If you run this, you'll notice that it runs really quick. Here's the output it produces:
URL for copy, 'Flash Sale - 80% Off!', at size, '550x800'
https://res.cloudinary.com/raymondcamden/image/upload/b_gen_fill,c_pad,h_800,w_550/b_black,bo_10px_solid_black,co_rgb:FFFFFF,l_text:Arial_35:Flash%20Sale%20-%2080%25%20Off%21/fl_layer_apply,g_south_east,x_10,y_10/original_for_demo

URL for copy, 'Holiday Sake - 80% Off!', at size, '550x800'
https://res.cloudinary.com/raymondcamden/image/upload/b_gen_fill,c_pad,h_800,w_550/b_black,bo_10px_solid_black,co_rgb:FFFFFF,l_text:Arial_35:Holiday%20Sake%20-%2080%25%20Off%21/fl_layer_apply,g_south_east,x_10,y_10/original_for_demo

URL for copy, 'Sale For You - 80% Off!', at size, '550x800'
https://res.cloudinary.com/raymondcamden/image/upload/b_gen_fill,c_pad,h_800,w_550/b_black,bo_10px_solid_black,co_rgb:FFFFFF,l_text:Arial_35:Sale%20For%20You%20-%2080%25%20Off%21/fl_layer_apply,g_south_east,x_10,y_10/original_for_demo

URL for copy, 'VIP Sale - 80% Off!', at size, '550x800'
https://res.cloudinary.com/raymondcamden/image/upload/b_gen_fill,c_pad,h_800,w_550/b_black,bo_10px_solid_black,co_rgb:FFFFFF,l_text:Arial_35:VIP%20Sale%20-%2080%25%20Off%21/fl_layer_apply,g_south_east,x_10,y_10/original_for_demo

URL for copy, 'Flash Sale - 80% Off!', at size, '800x500'
https://res.cloudinary.com/raymondcamden/image/upload/b_gen_fill,c_pad,h_500,w_800/b_black,bo_10px_solid_black,co_rgb:FFFFFF,l_text:Arial_35:Flash%20Sale%20-%2080%25%20Off%21/fl_layer_apply,g_south_east,x_10,y_10/original_for_demo

URL for copy, 'Holiday Sake - 80% Off!', at size, '800x500'
https://res.cloudinary.com/raymondcamden/image/upload/b_gen_fill,c_pad,h_500,w_800/b_black,bo_10px_solid_black,co_rgb:FFFFFF,l_text:Arial_35:Holiday%20Sake%20-%2080%25%20Off%21/fl_layer_apply,g_south_east,x_10,y_10/original_for_demo

URL for copy, 'Sale For You - 80% Off!', at size, '800x500'
https://res.cloudinary.com/raymondcamden/image/upload/b_gen_fill,c_pad,h_500,w_800/b_black,bo_10px_solid_black,co_rgb:FFFFFF,l_text:Arial_35:Sale%20For%20You%20-%2080%25%20Off%21/fl_layer_apply,g_south_east,x_10,y_10/original_for_demo

URL for copy, 'VIP Sale - 80% Off!', at size, '800x500'
https://res.cloudinary.com/raymondcamden/image/upload/b_gen_fill,c_pad,h_500,w_800/b_black,bo_10px_solid_black,co_rgb:FFFFFF,l_text:Arial_35:VIP%20Sale%20-%2080%25%20Off%21/fl_layer_apply,g_south_east,x_10,y_10/original_for_demo
So why does it run so fast? Technically, it isn't doing anything! All it's done is crafted the URLs. You can click on them however to see the result.
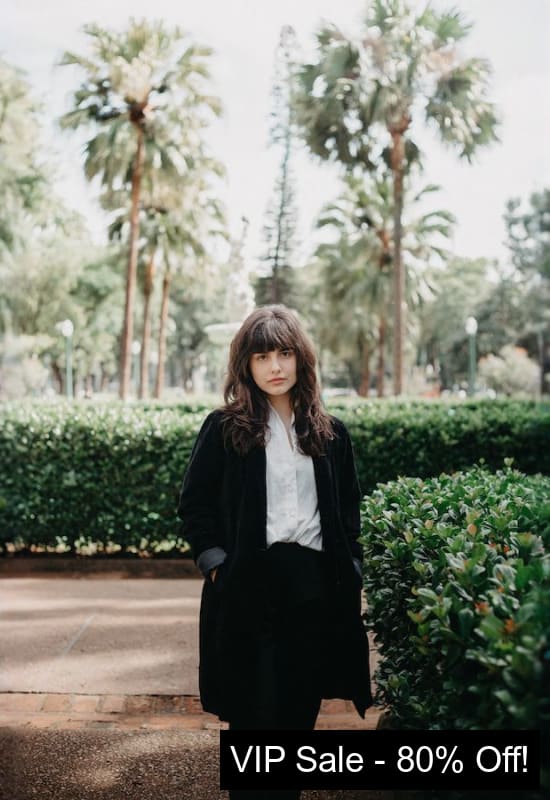
Here's two examples using the VIP tagline:


Now, at this point, you could literally be done! I host images on my blog directly from Cloudinary's CDN, and if you want, you can create a host alias that points to Cloudinary and completely hide the fact that you're using them. But, if you did want to actually download the results and store them locally, a few more lines in Python will do that.
from dotenv import load_dotenv
load_dotenv()

import cloudinary
from cloudinary import CloudinaryImage

import urllib.request
from slugify import slugify

config = cloudinary.config(secure=True)

# Read in our sizes first
sizes = [line.rstrip() for line in open('sizes.txt','r')]

# Then the text values we need
copy = [line.rstrip() for line in open('copy.txt','r')]

for size in sizes:
    for text in copy:
        print(f"URL for copy, '{text}', at size, '{size}'")

       	width, height = size.split('x')

        result = CloudinaryImage("original_for_demo").build_url(transformation= [
        {"width": width, "height": height, "background": "gen_fill", "crop": "pad"},
        {'color':"#FFFFFF", 'background': "black", 'border': "10px_solid_black", 'overlay': {'font_family': "Arial", 'font_size': 35, 'text': text}},
        {'flags': "layer_apply", 'gravity': "south_east", 'x': 10, 'y': 10}
        ])


        # Generate a local file name
        filename = f"output/{slugify(text)}_{size}.jpg"
        urllib.request.urlretrieve(result, filename)

        print(f"Saved as {filename}")
The change here is to just import urllib.request and slugify, and in my loop save the result to the filesystem. I put my sample code up here, https://github.com/cfjedimaster/ai-testingzone/tree/main/cloudinary. If you go into the output folder, you can see all the results as well.
Let me know what you think!